glTF 教程[中文]
本文翻译自 glTF Tutorial(作者:Marco Hutter, @javagl),涵盖全部 20 章内容及插图。
前置知识:需具备 JSON 基本知识,并对常见图形 API(如 OpenGL 或 WebGL)有基础性了解。本教程围绕 glTF 2.0 展开。
1. 引言
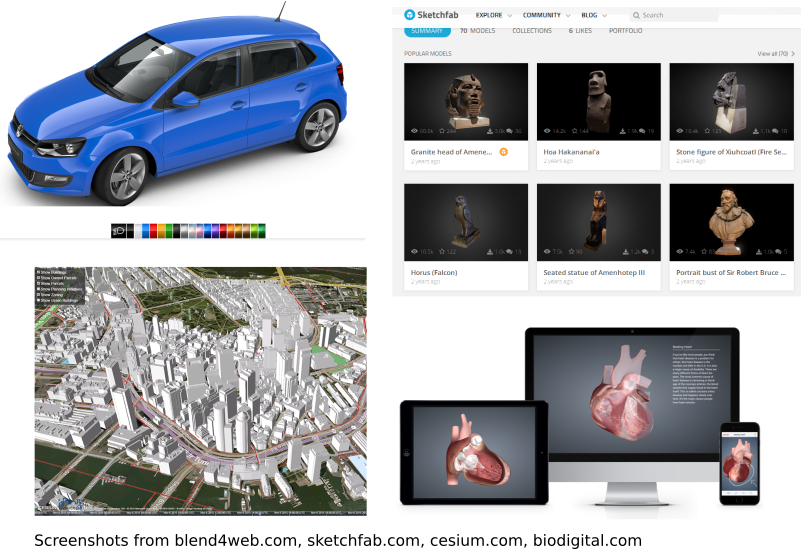
随着 WebGL 技术的普及,基于三维内容的在线应用与服务日益增多:电商平台提供交互式产品配置器,博物馆数字化展示馆藏文物,城市规划工具呈现建筑效果,医学教育则借助交互式三维模型展示人体解剖结构。
市场对通过网络高效传输并在客户端实时渲染的三维内容需求持续增长,但长期以来,三维内容创作端与运行时渲染端之间存在显著断层。
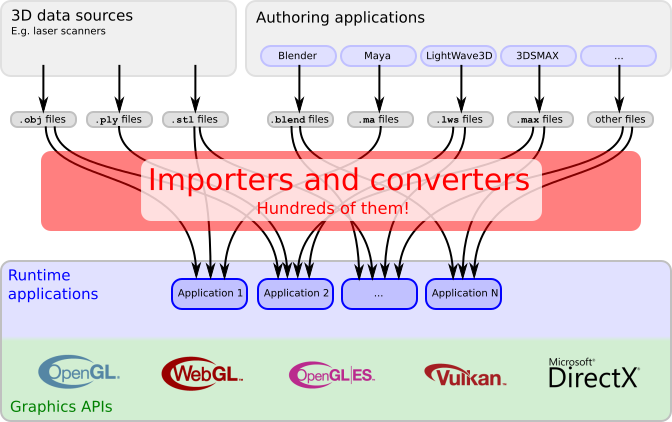
三维内容管线(3D Content Pipeline)
三维内容来源广泛,存储格式繁多(Wikipedia 收录逾 70 种三维图形文件格式)。原始扫描数据(如 OBJ、PLY、STL)通常仅携带几何信息,缺乏场景结构或渲染指令。而 Blender(.blend)、LightWave3D(.lws)、3ds Max(.max)、Maya(.ma)等创作工具使用专有格式,包含场景、几何体、光源、相机及动画等完整信息。因此,运行时应用必须为每种入格式构建导入器,解析场景结构,将几何数据转换为图形 API 所需表示,并上传至 GPU 内存。
glTF:面向三维场景的传输格式
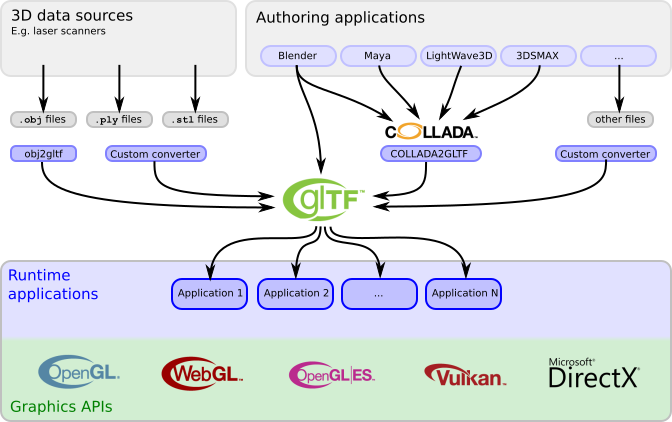
glTF 的设计初衷正是填补上述空白——此前尚无格式能同时满足高效网络传输与高性能渲染的双重需求。其场景结构采用 JSON 描述,紧凑且便于解析;三维数据则以可直接供图形 API 使用的二进制形式存储,无需解码或预处理。
随着越来越多的内容创作工具集成 glTF 导入/导出(例如 Blender 已支持基于物理的渲染材质)以及客户端应用对 glTF 的原生消费,glTF 正在有效弥合创作端与渲染端之间的鸿沟。转换工具与导出器可借助 Khronos glTF Validator 进行合规性验证。
2. glTF 基本结构
glTF 的核心设计理念是采用单一 JSON 文件描述完整的三维场景,其涵盖:
- 构成场景图(scene graph)的节点层次结构;
- 附着于节点的网格(mesh),定义可见几何体;
- 材质(material),控制表面外观;
- 动画(animation),描述节点变换随时间的变化;
- 蒙皮(skin),依据骨骼姿态对几何体进行变形;
- 相机(camera),设定渲染视点。
JSON 结构
场景对象以 JSON 数组形式存储,通过索引进行访问。对象间的引用关系同样以索引方式建立:
"meshes" :
[
    { ... }
    { ... }
    ...
],
"nodes":
[
    { "mesh": 0, ... },
    { "mesh": 5, ... },
    ...
]
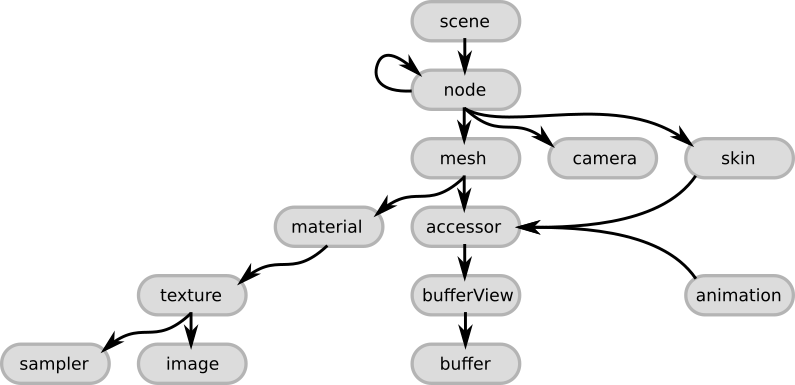
顶层核心元素如下:
- scene —— 入口点,引用场景图中的根节点;
- node —— 场景图节点,可携带可选的局部变换及子节点,并可附着网格、相机或蒙皮;
- camera —— 定义渲染视图配置;
- mesh —— 几何对象,通过 accessor 引用几何数据,通过 material 定义外观;
- skin —— 顶点蒙皮参数(基于骨骼姿态对网格进行变形),数据源自 accessor;
- animation —— 描述节点变换的时变特性;
- accessor —— 抽象数据源,供 mesh、skin、animation 使用,指向 bufferView,后者为 buffer 的一部分;
- material —— 表面外观参数,通常引用纹理;
- texture —— 由 sampler 与 image 联合定义,sampler 决定图像到物体表面的映射方式。
外部数据引用
二进制数据(几何体、纹理)通常独立于 JSON 存储于专用文件中。JSON 仅持有指向这些文件的链接,使其保持紧凑并利于网络传输。渲染器可直接取用这些数据,无需额外解析或预处理。
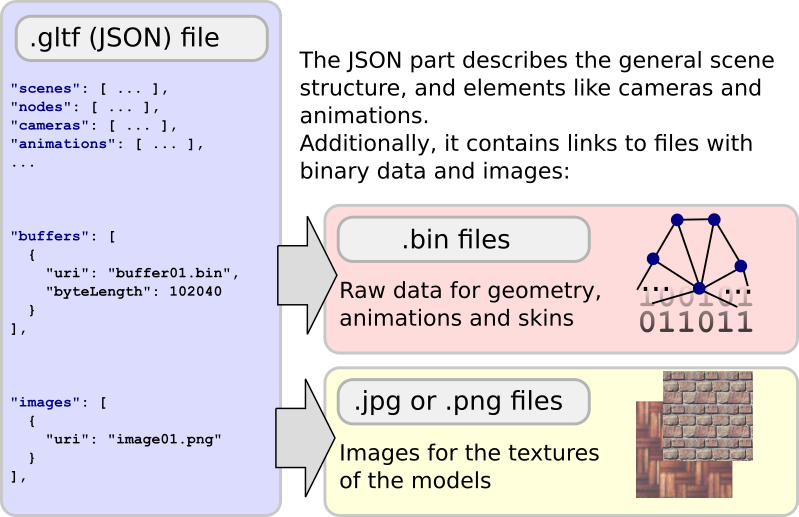
buffer与image是两种可引用外部资源的对象类型。
外部数据的读取与管理
处理流程始于 JSON 解析。解析后,buffer 与 image 可从对应顶层数组中按索引获取,每个条目所引用的二进制数据块被读入内存,通常以相同索引存入数组。
buffer 中的二进制数据
buffer 的 uri 指向原始二进制文件:
"buffer01": {
    "byteLength": 12352,
    "type": "arraybuffer",
    "uri": "buffer01.bin"
}
此数据块自身不携带任何语义,仅为一裸内存块,须经 bufferView 与 accessor 逐级解释后方可获得含义。二进制形式兼顾了网络传输效率与 GPU 直接消费的能力。
image 中的图像数据
image 可引用外部 PNG 或 JPEG 文件作为纹理:
"image01": {
    "uri": "image01.png"
}
PNG/JPEG 压缩可显著缩小文件体积。图像数据亦可内嵌于 buffer 而非指向外部文件。
数据 URI 中的二进制数据
buffer 与 image 的 URI 通常指向外部文件,但同样支持以数据 URI(data URI)形式将二进制数据直接嵌入 JSON。
3. 最小 glTF 文件
下例为一最小但完整的 glTF 资产(asset),其描述了一个带有索引的三角形:
{
  "scene": 0,
  "scenes" : [
    {
      "nodes" : [ 0 ]
    }
  ],

  "nodes" : [
    {
      "mesh" : 0
    }
  ],

  "meshes" : [
    {
      "primitives" : [ {
        "attributes" : {
          "POSITION" : 1
        },
        "indices" : 0
      } ]
    }
  ],

  "buffers" : [
    {
      "uri" : "data:application/octet-stream;base64,AAABAAIAAAAAAAAAAAAAAAAAAAAAAIA/AAAAAAAAAAAAAAAAAACAPwAAAAA=",
      "byteLength" : 44
    }
  ],
  "bufferViews" : [
    {
      "buffer" : 0,
      "byteOffset" : 0,
      "byteLength" : 6,
      "target" : 34963
    },
    {
      "buffer" : 0,
      "byteOffset" : 8,
      "byteLength" : 36,
      "target" : 34962
    }
  ],
  "accessors" : [
    {
      "bufferView" : 0,
      "byteOffset" : 0,
      "componentType" : 5123,
      "count" : 3,
      "type" : "SCALAR",
      "max" : [ 2 ],
      "min" : [ 0 ]
    },
    {
      "bufferView" : 1,
      "byteOffset" : 0,
      "componentType" : 5126,
      "count" : 3,
      "type" : "VEC3",
      "max" : [ 1.0, 1.0, 0.0 ],
      "min" : [ 0.0, 0.0, 0.0 ]
    }
  ],

  "asset" : {
    "version" : "2.0"
  }
}
scene 与 nodes 结构
scenes 数组是 glTF 中场景描述的入口——解析遍历由此处起始。每个 scene 含有一 nodes 数组,存放场景图根节点的索引。属性 scene(值为 0)指示加载资产时默认显示的场景。
  "scene": 0,
  "scenes" : [ { "nodes" : [ 0 ] } ],
  "nodes" : [ { "mesh" : 0 } ],
meshes
mesh 表示场景中实际出现的几何对象。mesh 自身通常不含属性,而是持有一组 mesh.primitive 对象作为构建块。每个图元承载几何数据的描述信息。
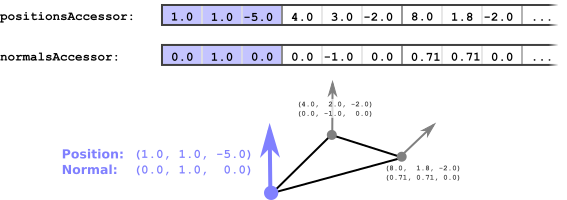
上例中仅一个 mesh,内含一个图元:其 attributes 中仅指定了 POSITION,同时通过 indices 属性指明使用索引几何。默认模式下,三个连续索引构成一个三角形的顶点。实际几何数据源自 accessor 对象。
"meshes" : [ { "primitives" : [ { "attributes" : { "POSITION" : 1 }, "indices" : 0 } ] } ],
buffer、bufferView 与 accessor 概念
Buffer:定义一裸的、无结构的二进制数据块。示例中使用数据 URI 编码了 44 字节:
"buffers" : [ { "uri" : "data:application/octet-stream;base64,...", "byteLength" : 44 } ],
BufferView:描述一个 buffer 中的”切片”(slice),由字节偏移与长度界定。示例包含两个 bufferView:第一个(偏移 0、长度 6)承载索引数据;第二个(偏移 8、长度 36)承载顶点位置:
"bufferViews" : [
  { "buffer" : 0, "byteOffset" : 0, "byteLength" : 6, "target" : 34963 },
  { "buffer" : 0, "byteOffset" : 8, "byteLength" : 36, "target" : 34962 }
],
Accessor:定义如何解释 bufferView 中数据的类型与布局。第一个 accessor 描述索引(类型 UNSIGNED_SHORT,标量),第二个描述顶点位置(类型 FLOAT,VEC3):
"accessors" : [
  { "bufferView" : 0, "byteOffset" : 0, "componentType" : 5123, "count" : 3, "type" : "SCALAR", "max" : [ 2 ], "min" : [ 0 ] },
  { "bufferView" : 1, "byteOffset" : 0, "componentType" : 5126, "count" : 3, "type" : "VEC3", "max" : [ 1.0, 1.0, 0.0 ], "min" : [ 0.0, 0.0, 0.0 ] }
],
渲染时,渲染器可沿上述引用链路逐级解析,将所需数据连同类型与布局信息一并发送至 GPU。
asset 描述
glTF 2.0 要求 JSON 必须包含 asset 属性,至少需声明 version:
"asset" : { "version" : "2.0" }
4. 场景与节点
场景
单个 glTF 文件可存储多个场景。scene 属性指明默认应显示的场景。每个 scene 的 nodes 数组包含场景图根节点的索引。多数情况下场景仅有一个根节点。
节点构成的场景图
节点可包含 children 数组,由此形成层次结构。遍历过程为递归形式:先处理当前节点所携带的元素,再进入子节点递归处理。
traverse(node) {
    processElements(node);
    for each (child in node.children) {
        traverse(child);
    }
}
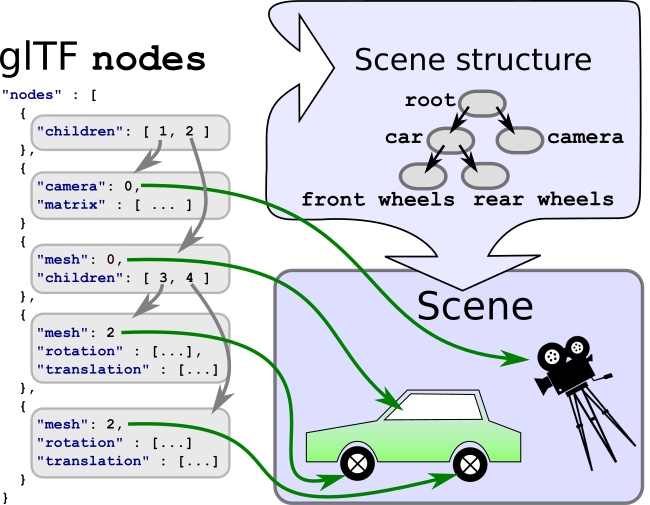
局部变换与全局变换
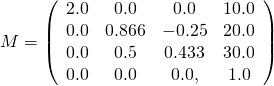
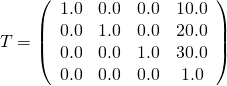
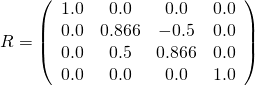
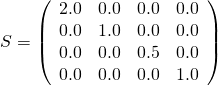
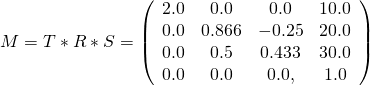
节点的局部变换:可采用 matrix(16 个 float,列主序)或 TRS 三元组(translation、rotation 四元数、scale)描述。TRS 情形下,局部变换矩阵计算为 \(M = T \times R \times S\),顺序不可交换。缺失的属性取单位值(恒等映射)。
"node0": { "matrix": [ 2.0, 0.0, 0.0, 0.0, 0.0, 0.866, 0.5, 0.0, 0.0, -0.25, 0.433, 0.0, 10.0, 20.0, 30.0, 1.0 ] }
"node0": { "translation": [ 10.0, 20.0, 30.0 ], "rotation": [ 0.259, 0.0, 0.0, 0.966 ], "scale": [ 2.0, 1.0, 0.5 ] }
节点的全局变换:定义为自根节点至当前节点路径上所有局部变换的连乘积。由于动画可在运行时修改局部变换,全局变换不能仅计算一次——须逐帧重新求值,或采用缓存失效策略。
结构:               局部变换   全局变换
root                 R         R
 +- nodeA            A         R*A
     +- nodeB        B         R*A*B
     +- nodeC        C         R*A*C
5. Buffer、BufferView 及 Accessor
Buffer
Buffer 为一裸二进制数据块,不含结构与语义。数据通过 URI 引用(可指向外部文件或使用数据 URI)。
"buffers" : [ { "uri" : "data:application/octet-stream;base64,...", "byteLength" : 44 } ],

BufferView
BufferView 表示一个 buffer 中的”切片”,由字节偏移与字节长度界定。
"bufferViews" : [
  { "buffer" : 0, "byteOffset" : 0, "byteLength" : 6, "target" : 34963 },
  { "buffer" : 0, "byteOffset" : 8, "byteLength" : 36, "target" : 34962 }
],
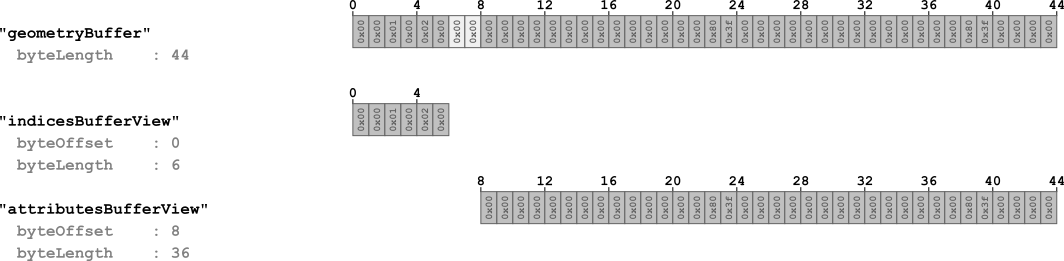
每个 bufferView 的 target 属性指示其用途:34962(ARRAY_BUFFER)用于顶点属性数据,34963(ELEMENT_ARRAY_BUFFER)用于顶点索引数据。
Accessor
Accessor 引用一个 bufferView,并提供数据类型与布局的元信息。
数据类型:type 指定标量、向量或矩阵类型("SCALAR"、"VEC3"、"MAT4" 等)。componentType 为 GL 常量(如 5126 = FLOAT,5123 = UNSIGNED_SHORT)。
"accessors" : [
  { "bufferView" : 0, "byteOffset" : 0, "componentType" : 5123, "count" : 3, "type" : "SCALAR", "max" : [ 2 ], "min" : [ 0 ] },
  { "bufferView" : 1, "byteOffset" : 0, "componentType" : 5126, "count" : 3, "type" : "VEC3", "max" : [ 1.0, 1.0, 0.0 ], "min" : [ 0.0, 0.0, 0.0 ] }
],
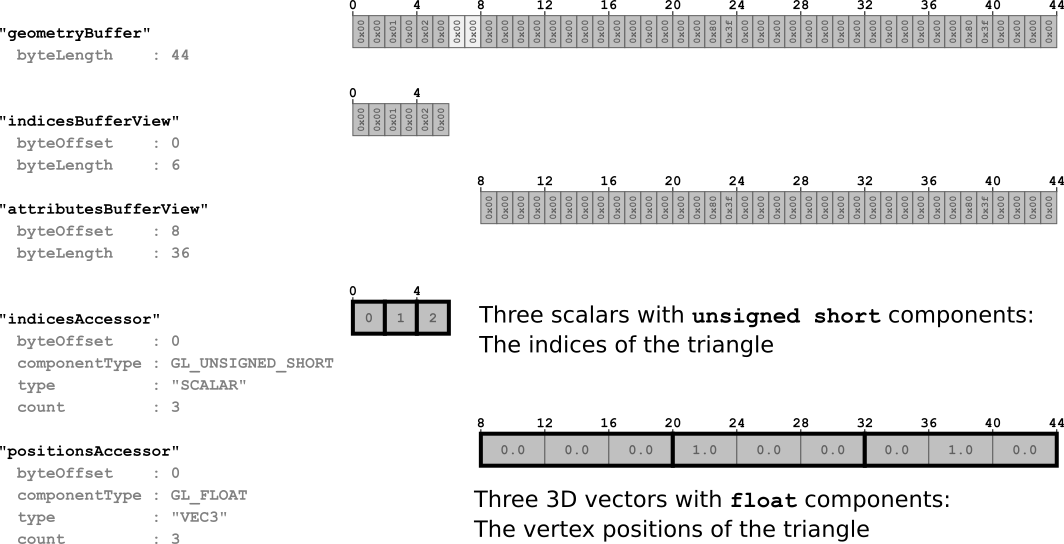
数据布局:count 指明元素个数,byteOffset 为数据在 bufferView 中的起始位置。
数据对齐:当 componentType 为 5126(FLOAT)时,数据须对齐至 4 字节边界。对齐规则如下:
- accessor 的
byteOffset须能被组件类型大小整除; - accessor 的
byteOffset与其所属 bufferView 的byteOffset之和亦须能被整除。
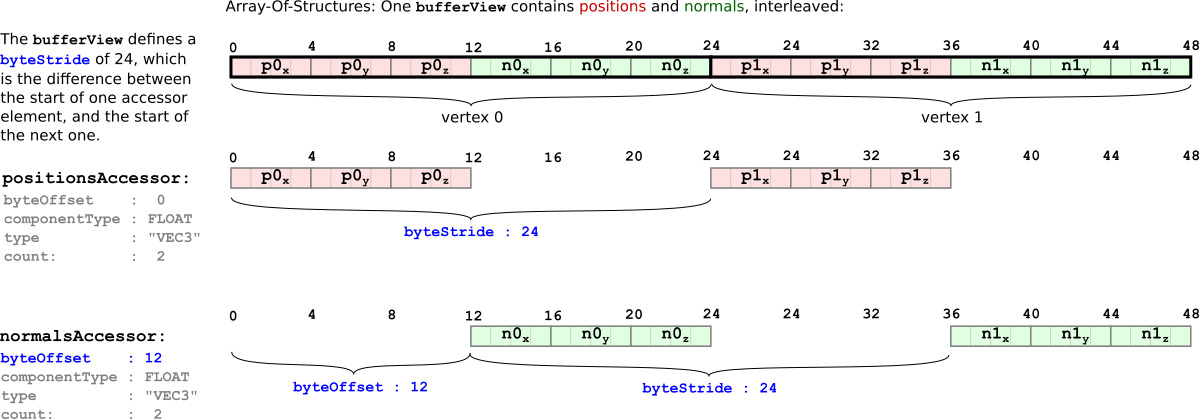
数据交织(Interleaving):同一 bufferView 中的属性可按结构体数组(Array-of-Structures,AoS)方式交织存储。bufferView 的 byteStride 属性表示相邻元素起始位置之间的字节跨度。
数据内容:min 与 max 给出所有数据元素的逐分量最小/最大值(如顶点位置的包围盒,可用于可见性判定或下载优先级排序)。
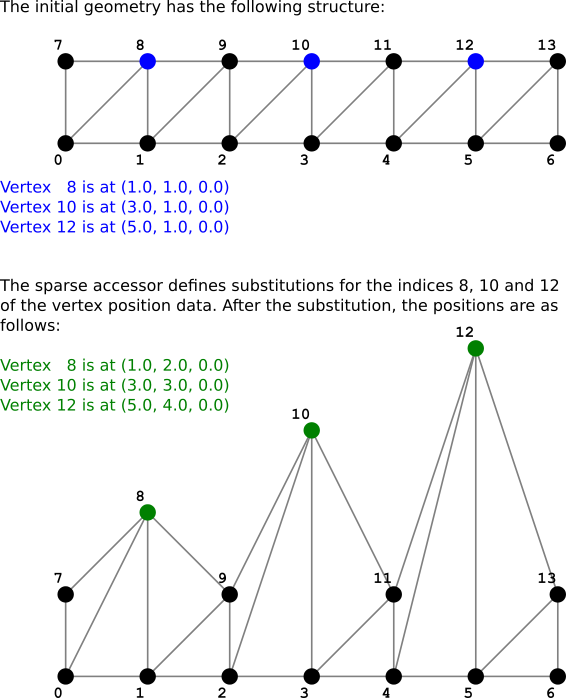
稀疏 Accessor
glTF 2.0 引入稀疏 accessor 机制,可紧凑存储仅有少量条目存在差异的多个数据块——仅需存储一份基础数据,再通过稀疏 accessor 覆盖差异条目。
{
  "scenes" : [ { "nodes" : [ 0 ] } ],
  "nodes" : [ { "mesh" : 0 } ],
  "meshes" : [ {
    "primitives" : [ { "attributes" : { "POSITION" : 1 }, "indices" : 0 } ]
  } ],
  "buffers" : [ { "uri" : "data:application/gltf-buffer;base64,...", "byteLength" : 284 } ],
  "bufferViews" : [
    { "buffer" : 0, "byteOffset" : 0, "byteLength" : 72, "target" : 34963 },
    { "buffer" : 0, "byteOffset" : 72, "byteLength" : 168 },
    { "buffer" : 0, "byteOffset" : 240, "byteLength" : 6 },
    { "buffer" : 0, "byteOffset" : 248, "byteLength" : 36 }
  ],
  "accessors" : [
    { "bufferView" : 0, "byteOffset" : 0, "componentType" : 5123, "count" : 36, "type" : "SCALAR", "max" : [ 13 ], "min" : [ 0 ] },
    {
      "bufferView" : 1, "byteOffset" : 0, "componentType" : 5126, "count" : 14, "type" : "VEC3",
      "max" : [ 6.0, 4.0, 0.0 ], "min" : [ 0.0, 0.0, 0.0 ],
      "sparse" : {
        "count" : 3,
        "indices" : { "bufferView" : 2, "byteOffset" : 0, "componentType" : 5123 },
        "values" : { "bufferView" : 3, "byteOffset" : 0 }
      }
    }
  ],
  "asset" : { "version" : "2.0" }
}

稀疏 accessor 中,sparse.count 指定被替换元素的个数;sparse.indices 指向存放被替换元素索引的 bufferView;sparse.values 指向存放替换数据的 bufferView。
6. 简单动画示例
节点的局部变换可通过动画随时间动态改变。
节点的 rotation 属性
下例中节点携带一旋转四元数,其初始值表示”零旋转”:
"nodes" : [ { "mesh" : 0, "rotation" : [ 0.0, 0.0, 0.0, 1.0 ] } ],
动画数据
相对于最小示例,新增了一个 buffer(承载 100 字节原始动画数据)、一个 bufferView 及两个 accessor:
"buffers" : [
  { "uri" : "data:application/octet-stream;base64,...", "byteLength" : 44 },
  { "uri" : "data:application/octet-stream;base64,...", "byteLength" : 100 }
],
"bufferViews" : [
  { "buffer" : 0, "byteOffset" : 0, "byteLength" : 6, "target" : 34963 },
  { "buffer" : 0, "byteOffset" : 8, "byteLength" : 36, "target" : 34962 },
  { "buffer" : 1, "byteOffset" : 0, "byteLength" : 100 }
],
"accessors" : [
  { "bufferView" : 0, "byteOffset" : 0, "componentType" : 5123, "count" : 3, "type" : "SCALAR", "max" : [ 2 ], "min" : [ 0 ] },
  { "bufferView" : 1, "byteOffset" : 0, "componentType" : 5126, "count" : 3, "type" : "VEC3", "max" : [ 1.0, 1.0, 0.0 ], "min" : [ 0.0, 0.0, 0.0 ] },
  { "bufferView" : 2, "byteOffset" : 0, "componentType" : 5126, "count" : 5, "type" : "SCALAR", "max" : [ 1.0 ], "min" : [ 0.0 ] },
  { "bufferView" : 2, "byteOffset" : 20, "componentType" : 5126, "count" : 5, "type" : "VEC4", "max" : [ 0.0, 0.0, 1.0, 1.0 ], "min" : [ 0.0, 0.0, 0.0, -0.707 ] }
],
时间-旋转映射表:
| 时间t/s | 旋转(四元数) | 语义 |
|---|---|---|
| 0.0 | (0.0, 0.0, 0.0, 1.0) | 0° |
| 0.25 | (0.0, 0.0, 0.707, 0.707) | 绕 z 轴 +90° |
| 0.5 | (0.0, 0.0, 1.0, 0.0) | 绕 z 轴 +180° |
| 0.75 | (0.0, 0.0, 0.707, -0.707) | 绕 z 轴 +270°(或 -90°) |
| 1.0 | (0.0, 0.0, 0.0, 1.0) | 绕 z 轴 +360°(回到原点) |
该关键帧序列描述了一个持续 1 秒、绕 z 轴旋转 360° 的动画。
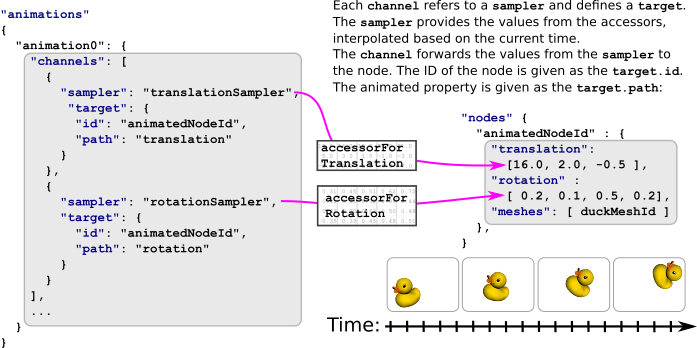
animation 对象
"animations": [
  {
    "samplers" : [ { "input" : 2, "interpolation" : "LINEAR", "output" : 3 } ],
    "channels" : [ { "sampler" : 0, "target" : { "node" : 0, "path" : "rotation" } } ]
  }
],
动画对象包括 sampler(数据源)与 channel(连接数据源到目标)。sampler 以 input 提供关键帧时间戳,output 提供对应值,interpolation 指定插值模式。channel 则将 sampler 连接到特定节点的特定属性路径(如 "rotation")。
7. 动画
单个 animation 可包含多个 channel,以同时驱动不同属性的动画:
"animations": [
  {
    "samplers" : [
      { "input" : 2, "interpolation" : "LINEAR", "output" : 3 },
      { "input" : 2, "interpolation" : "LINEAR", "output" : 4 }
    ],
    "channels" : [
      { "sampler" : 0, "target" : { "node" : 0, "path" : "rotation" } },
      { "sampler" : 1, "target" : { "node" : 0, "path" : "translation" } }
    ]
  }
],
动画采样器(Animation Sampler)
animation.sampler 对象定义 accessor 中的值如何在关键帧之间进行插值。
给定当前时间 \(t_{\text{curr}}\),求值的算法如下:
- 给定 \(t_{\text{curr}}\);
- 在时间 accessor 中定位 \(t_{\text{prev}}\)(满足 \(t_{\text{prev}} < t_{\text{curr}}\) 的最大时间戳)与 \(t_{\text{next}}\)(满足 \(t_{\text{next}} > t_{\text{curr}}\) 的最小时间戳);
- 获取对应的 \(\mathbf{v}{\text{prev}}\) 与 \(\mathbf{v}{\text{next}}\);
- 计算插值因子 \(s = (t_{\text{curr}} - t_{\text{prev}}) / (t_{\text{next}} - t_{\text{prev}})\);
- 计算当前值 \(\mathbf{v}{\text{curr}} = \mathbf{v}{\text{prev}} + s \cdot (\mathbf{v}{\text{next}} - \mathbf{v}{\text{prev}})\).
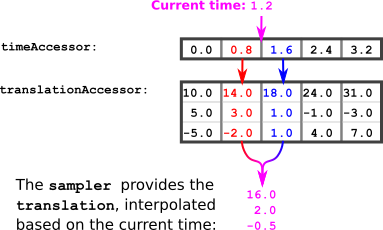
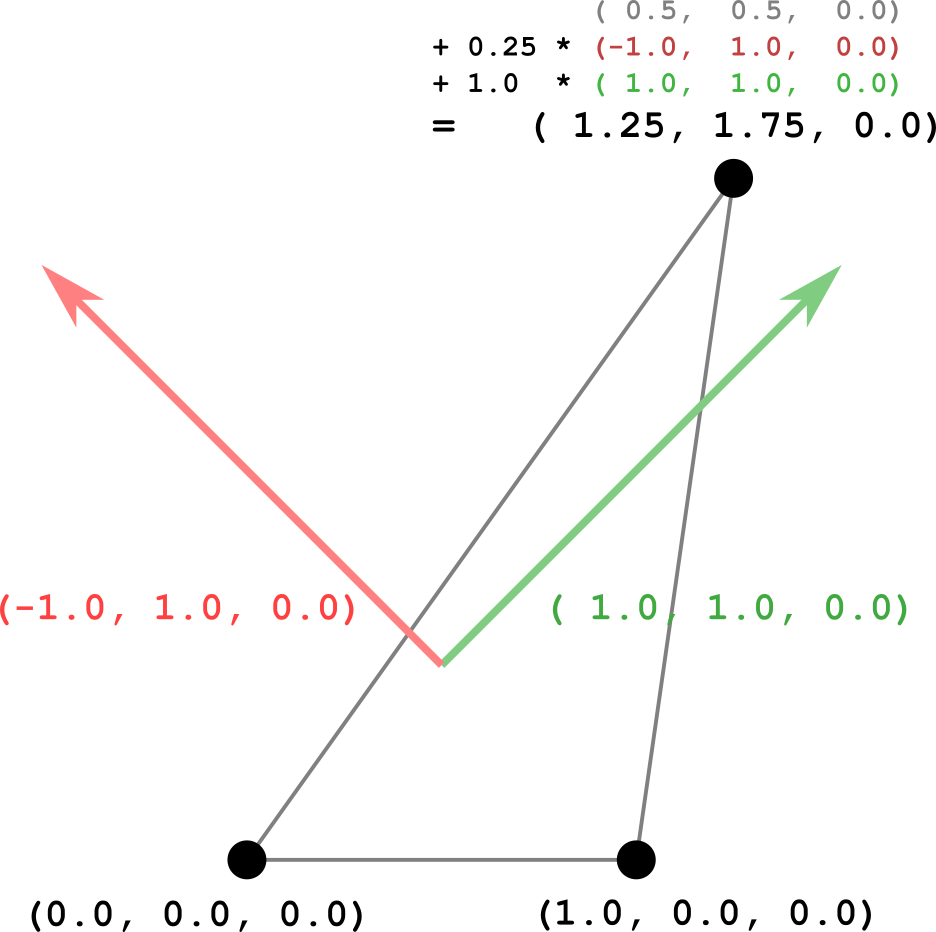
数值示例(\(t_{\text{curr}} = 1.2\)):
t_prev = 0.8,   t_next = 1.6
v_prev = (14.0, 3.0, -2.0)
v_next = (18.0, 1.0,  1.0)
s = (1.2 - 0.8) / (1.6 - 0.8) = 0.5
v_curr = (14.0, 3.0, -2.0) + 0.5 * (4.0, -2.0, 3.0) = (16.0, 2.0, -0.5)
即在 \(t = 1.2\) 时刻,该节点的平移量应为 \((16.0, 2.0, -0.5)\).
动画通道(Animation Channel)
animation.channel 建立 sampler 计算所得值与目标节点属性之间的映射关系。每个 channel 引用一个 sampler 的索引,其 target 指定目标节点索引及属性路径。
插值模式
glTF 支持三种插值模式:
STEP(阶梯插值):物体在关键帧之间无过渡,直接采用 \(t_{\text{prev}}\) 处的变换值。
LINEAR(线性插值):如上例所示。标量与向量类型使用标准 lerp,四元数旋转须使用球面线性插值(slerp):
Point lerp(previousPoint, nextPoint, interpolationValue)
    return previousPoint + interpolationValue * (nextPoint - previousPoint)
Quat slerp(previousQuat, nextQuat, interpolationValue)
    var dotProduct = dot(previousQuat, nextQuat)
    if(dotProduct < 0.0)
        nextQuat = -nextQuat
        dotProduct = -dotProduct
    if(dotProduct > 0.9995)
        return normalize(previousQuat + interpolationValue(nextQuat - previousQuat))
    var theta_0 = acos(dotProduct)
    var theta = interpolationValue * theta_0
    var sin_theta = sin(theta)
    var sin_theta_0 = sin(theta_0)
    var scalePreviousQuat = cos(theta) - dotproduct * sin_theta / sin_theta_0
    var scaleNextQuat = sin_theta / sin_theta_0
    return scalePreviousQuat * previousQuat + scaleNextQuat * nextQuat
CUBICSPLINE(三次样条插值):需在每个关键帧处存储三个值:输入切线、关键帧值、输出切线。输入/输出切线为归一化向量,使用前须按时间间隔缩放:
previousTangent = deltaTime * previousOutputTangent
nextTangent = deltaTime * nextInputTangent
Point cubicSpline(previousPoint, previousTangent, nextPoint, nextTangent, interpolationValue)
    t = interpolationValue
    t2 = t * t
    t3 = t2 * t
    return (2*t3 - 3*t2 + 1) * previousPoint + (t3 - 2*t2 + t) * previousTangent
         + (-2*t3 + 3*t2) * nextPoint + (t3 - t2) * nextTangent
8. 简单网格示例
下例展示了一个包含多种顶点属性的 glTF 资产:
{
  "scene": 0,
  "scenes" : [ { "nodes" : [ 0, 1] } ],
  "nodes" : [
    { "mesh" : 0 },
    { "mesh" : 0, "translation" : [ 1.0, 0.0, 0.0 ] }
  ],
  "meshes" : [ {
    "primitives" : [ { "attributes" : { "POSITION" : 1, "NORMAL" : 2 }, "indices" : 0 } ]
  } ],
  "buffers" : [ { "uri" : "data:application/octet-stream;base64,...", "byteLength" : 80 } ],
  "bufferViews" : [
    { "buffer" : 0, "byteOffset" : 0, "byteLength" : 6, "target" : 34963 },
    { "buffer" : 0, "byteOffset" : 8, "byteLength" : 72, "target" : 34962 }
  ],
  "accessors" : [
    { "bufferView" : 0, "byteOffset" : 0, "componentType" : 5123, "count" : 3, "type" : "SCALAR", "max" : [ 2 ], "min" : [ 0 ] },
    { "bufferView" : 1, "byteOffset" : 0, "componentType" : 5126, "count" : 3, "type" : "VEC3", "max" : [ 1.0, 1.0, 0.0 ], "min" : [ 0.0, 0.0, 0.0 ] },
    { "bufferView" : 1, "byteOffset" : 36, "componentType" : 5126, "count" : 3, "type" : "VEC3", "max" : [ 0.0, 0.0, 1.0 ], "min" : [ 0.0, 0.0, 1.0 ] }
  ],
  "asset" : { "version" : "2.0" }
}
图元的 attributes 字典新增了 NORMAL(顶点法线)属性。同一 mesh 被两个节点引用:第一个节点采用单位变换,第二个节点通过 translation 沿 x 轴平移 1.0 单位,由此产生两个渲染实例。
9. 网格
网格图元(Mesh Primitive)
每个 mesh 包含一个 mesh.primitive 对象数组——这些图元是构成更大几何对象的”构件”,汇总了该部分物体的全部渲染信息。
图元属性
图元的 attributes 字典通过索引引用 accessor,为每个顶点属性提供数据来源:
"meshes" : [ {
  "primitives" : [ { "attributes" : { "POSITION" : 1, "NORMAL" : 2 }, "indices" : 0 } ]
} ],
索引几何与非索引几何
当图元包含 indices 属性时,表示使用索引几何。省略该属性则为非索引几何,此时连续的顶点属性元素直接定义图元。
图元模式(Primitive Mode)
默认模式下,几何数据描述三角形网格。对于索引几何,indices accessor 中每三个连续元素定义一个三角形;对于非索引几何,则是每三个连续顶点属性元素。可通过 mode 属性切换为点(0)、线段或三角形条带(triangle strip)等——这些常量对应 GL 枚举值(如 POINTS、TRIANGLES)。
图元材质
图元可通过 material 属性引用材质索引。若省略,渲染器通常使用默认材质(均匀 50% 灰色)。
网格附着于节点
同一 mesh 可被多个节点引用,在不同全局变换下多次渲染:
"scenes" : [ { "nodes" : [ 0, 1] } ],
"nodes" : [
  { "mesh" : 0 },
  { "mesh" : 0, "translation" : [ 1.0, 0.0, 0.0 ] }
],
10. 材质
glTF 不仅传输场景结构与几何体,还编码物体的外观信息——即物体应如何被渲染到屏幕上。
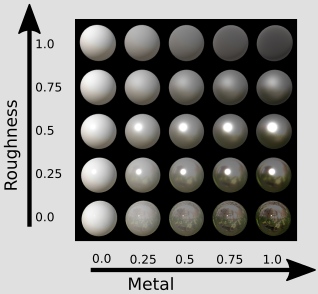
基于物理的渲染(Physically-Based Rendering, PBR)
金属-粗糙度(metallic-roughness)模型通过三个核心参数编码表面物理属性:
- base color(基色)—— 表面的固有色;
- metallic(金属度)—— 表面反射行为接近金属的程度;
- roughness(粗糙度)—— 表面微观起伏程度,决定光线散射分布。
另一种材质表示(specular-glossiness 模型)通过扩展(extension)提供。上述属性可以单一常量值给出,也可以通过纹理在表面逐点变化。
glTF 还支持以下可选效果:
- 自发光纹理(emissive texture)—— 标识可发光的表面区域;
- 环境光遮蔽纹理(occlusion texture)—— 模拟自遮挡阴影效果;
- 法线贴图(normal map)—— 在不增加几何分辨率的前提下模拟表面细节起伏。
11. 简单材质示例
下例在最小 glTF 资产中引入了一个简单材质:
{
  "scene": 0,
  "scenes" : [ { "nodes" : [ 0 ] } ],
  "nodes" : [ { "mesh" : 0 } ],
  "meshes" : [ { "primitives" : [ { "attributes" : { "POSITION" : 1 }, "indices" : 0, "material" : 0 } ] } ],
  "buffers" : [ { "uri" : "data:application/octet-stream;base64,...", "byteLength" : 44 } ],
  "bufferViews" : [
    { "buffer" : 0, "byteOffset" : 0, "byteLength" : 6, "target" : 34963 },
    { "buffer" : 0, "byteOffset" : 8, "byteLength" : 36, "target" : 34962 }
  ],
  "accessors" : [
    { "bufferView" : 0, "byteOffset" : 0, "componentType" : 5123, "count" : 3, "type" : "SCALAR", "max" : [ 2 ], "min" : [ 0 ] },
    { "bufferView" : 1, "byteOffset" : 0, "componentType" : 5126, "count" : 3, "type" : "VEC3", "max" : [ 1.0, 1.0, 0.0 ], "min" : [ 0.0, 0.0, 0.0 ] }
  ],
  "materials" : [ { "pbrMetallicRoughness": { "baseColorFactor": [ 1.000, 0.766, 0.336, 1.0 ], "metallicFactor": 0.5, "roughnessFactor": 0.1 } } ],
  "asset" : { "version" : "2.0" }
}
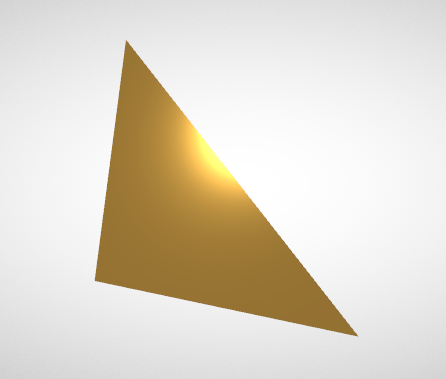
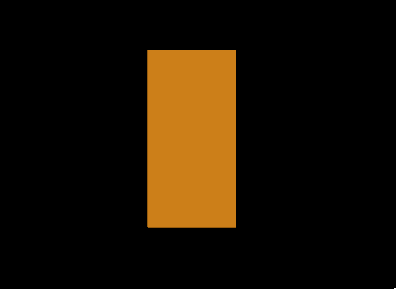
材质定义通过 pbrMetallicRoughness 对象给出。baseColorFactor 为 RGBA 向量(此处配置为亮橙色),metallicFactor 取 0.5 使反射特性介于金属与非金属之间,roughnessFactor 取 0.1 形成较光滑的表面。材质由 mesh.primitive 的 material 属性(索引 0)引用并生效。
12. 纹理、图像及采样器
glTF JSON 中存在三个顶层数组用于纹理系统的定义:textures、samplers 及 images。每个纹理通过索引分别引用一个 sampler 和一个 image。image 的 URI 指向实际图像文件。sampler 则控制图像如何映射到物体表面(过滤模式与包裹模式)。
"textures": [ { "source": 0, "sampler": 0 } ],
"images": [ { "uri": "testTexture.png" } ],
"samplers": [ { "magFilter": 9729, "minFilter": 9987, "wrapS": 33648, "wrapT": 33648 } ],
13. 简单纹理示例
材质属性既可为单一常量值,也可通过纹理在物体表面逐点变化。下例演示了如何将纹理作为基色来源:
{
  "scene": 0, "scenes" : [ { "nodes" : [ 0 ] } ],
  "nodes" : [ { "mesh" : 0 } ],
  "meshes" : [ { "primitives" : [ { "attributes" : { "POSITION" : 1, "TEXCOORD_0" : 2 }, "indices" : 0, "material" : 0 } ] } ],

  "materials" : [ { "pbrMetallicRoughness" : { "baseColorTexture" : { "index" : 0 }, "metallicFactor" : 0.0, "roughnessFactor" : 1.0 } } ],

  "textures" : [ { "sampler" : 0, "source" : 0 } ],
  "images" : [ { "uri" : "testTexture.png" } ],
  "samplers" : [ { "magFilter" : 9729, "minFilter" : 9987, "wrapS" : 33648, "wrapT" : 33648 } ],

  "buffers" : [ { "uri" : "data:application/gltf-buffer;base64,...", "byteLength" : 108 } ],
  "bufferViews" : [
    { "buffer" : 0, "byteOffset" : 0, "byteLength" : 12, "target" : 34963 },
    { "buffer" : 0, "byteOffset" : 12, "byteLength" : 96, "byteStride" : 12, "target" : 34962 }
  ],
  "accessors" : [
    { "bufferView" : 0, "byteOffset" : 0, "componentType" : 5123, "count" : 6, "type" : "SCALAR", "max" : [ 3 ], "min" : [ 0 ] },
    { "bufferView" : 1, "byteOffset" : 0, "componentType" : 5126, "count" : 4, "type" : "VEC3", "max" : [ 1.0, 1.0, 0.0 ], "min" : [ 0.0, 0.0, 0.0 ] },
    { "bufferView" : 1, "byteOffset" : 48, "componentType" : 5126, "count" : 4, "type" : "VEC2", "max" : [ 1.0, 1.0 ], "min" : [ 0.0, 0.0 ] }
  ],
  "asset" : { "version" : "2.0" }
}
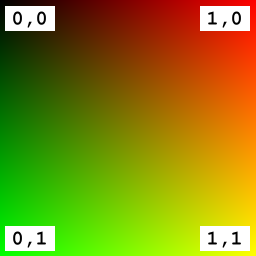
材质中 baseColorTexture 持有纹理索引。要在图元上应用纹理,顶点数据须包含纹理坐标属性(默认使用 TEXCOORD_0)。若存在多组纹理坐标集,可通过 texCoord 属性选择特定的坐标集:
"baseColorTexture" : { "index" : 0, "texCoord": 2 },
此时该纹理将使用名为 TEXCOORD_2 的属性中所存储的纹理坐标。
14. 高级材质
材质的表面属性远不止基色一项。本节以 Khronos PBR 官方示例模型 “WaterBottle” 演示多种纹理控制的材质属性。
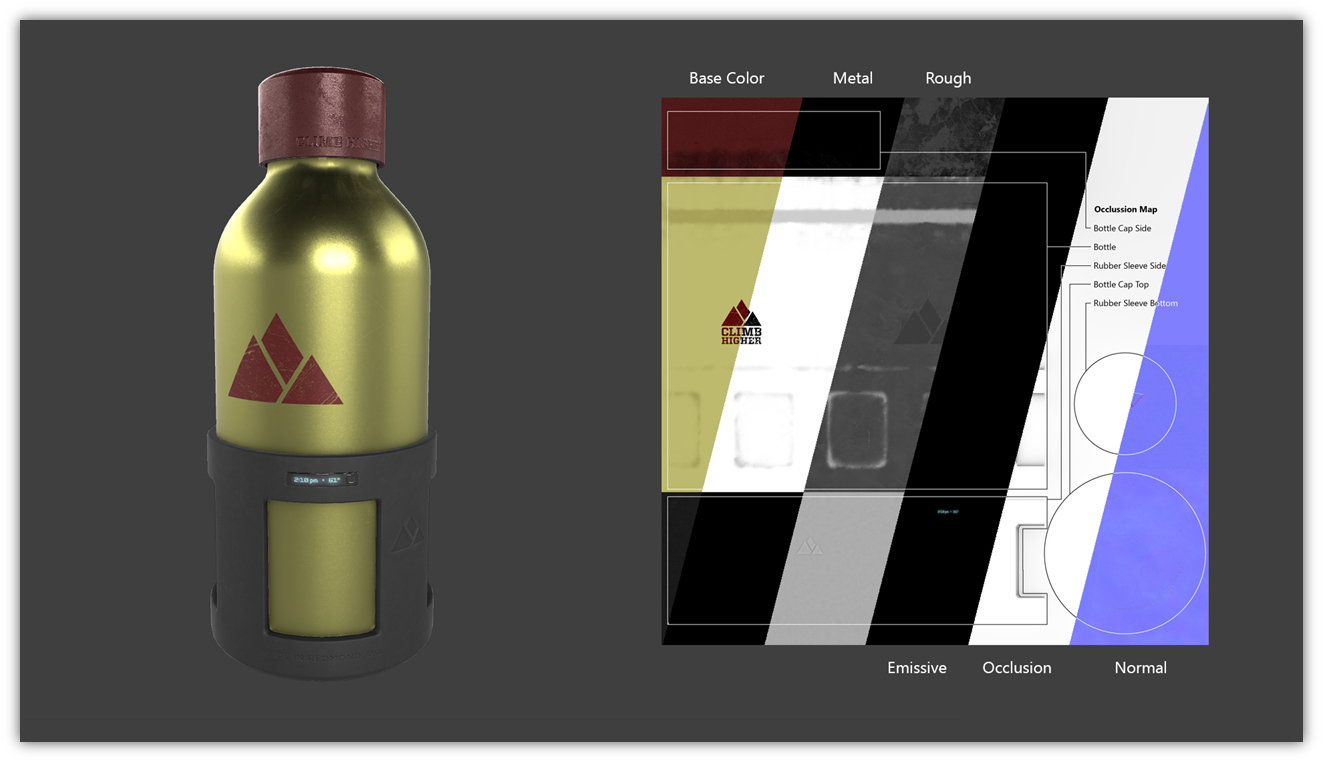
粗糙度纹理:瓶身低粗糙度呈现光亮外观,瓶盖区域则具有粗糙表面结构。
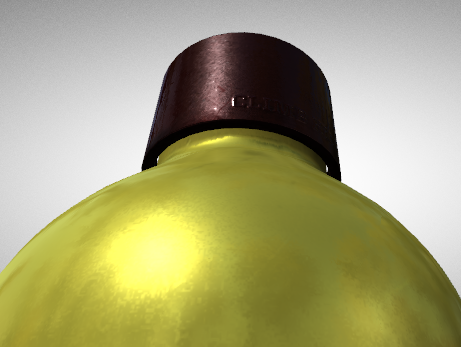
金属度纹理:瓶体反射来自周围环境贴图的入射光,呈现金属质感。
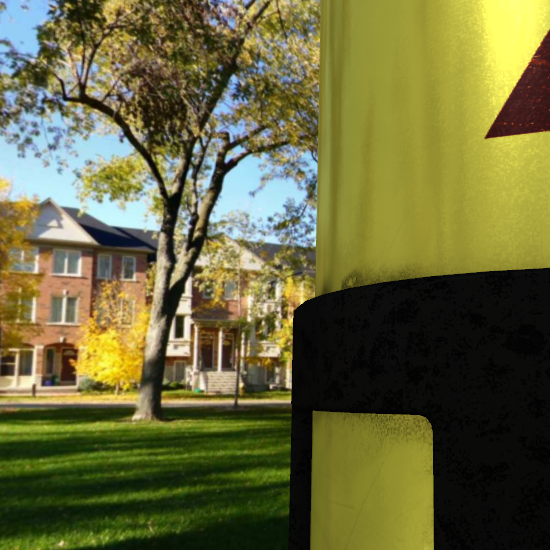
自发光纹理:即使在暗环境中,自发光纹理中编码的文字信息仍保持可见。
法线贴图:瓶盖文字呈现浮雕般的凹凸感,在不增加多边形数量的前提下提供了细节几何的视觉假象。
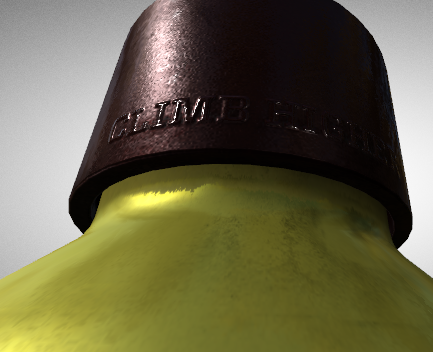
上述纹理与金属-粗糙度 PBR 模型协同工作,可在不同渲染器中实现各类真实世界材质的一致渲染。
参考实现:Khronos glTF Sample Viewer 提供了基于 WebGL 的 PBR 渲染器参考。
15. 简单相机示例
视图配置通常由场景中的虚拟相机描述——相机位于特定位置,指向特定方向。下例定义了两个 camera 对象:一个透视相机与一个正交相机。
{
  "scene": 0,
  "scenes" : [ { "nodes" : [ 0, 1, 2 ] } ],
  "nodes" : [
    { "rotation" : [ -0.383, 0.0, 0.0, 0.924 ], "mesh" : 0 },
    { "translation" : [ 0.5, 0.5, 3.0 ], "camera" : 0 },
    { "translation" : [ 0.5, 0.5, 3.0 ], "camera" : 1 }
  ],
  "cameras" : [
    { "type": "perspective", "perspective": { "aspectRatio": 1.0, "yfov": 0.7, "zfar": 100, "znear": 0.01 } },
    { "type": "orthographic", "orthographic": { "xmag": 1.0, "ymag": 1.0, "zfar": 100, "znear": 0.01 } }
  ],
  "meshes" : [ { "primitives" : [ { "attributes" : { "POSITION" : 1 }, "indices" : 0 } ] } ],
  "buffers" : [ { "uri" : "data:application/octet-stream;base64,...", "byteLength" : 60 } ],
  "bufferViews" : [
    { "buffer" : 0, "byteOffset" : 0, "byteLength" : 12, "target" : 34963 },
    { "buffer" : 0, "byteOffset" : 12, "byteLength" : 48, "target" : 34962 }
  ],
  "accessors" : [
    { "bufferView" : 0, "byteOffset" : 0, "componentType" : 5123, "count" : 6, "type" : "SCALAR", "max" : [ 3 ], "min" : [ 0 ] },
    { "bufferView" : 1, "byteOffset" : 0, "componentType" : 5126, "count" : 4, "type" : "VEC3", "max" : [ 1.0, 1.0, 0.0 ], "min" : [ 0.0, 0.0, 0.0 ] }
  ],
  "asset" : { "version" : "2.0" }
}

相机定义在顶层 cameras 数组中,并通过节点的 camera 属性附着。几何体为一单位正方形,绕 x 轴旋转 -45° 以便凸显两种相机投影的差异。两个相机节点均平移至 (0.5, 0.5, 3.0),分别绑定透视与正交相机。
16. 相机
透视相机与正交相机
- 透视相机(Perspective):视景体为截锥(frustum),产生正确的透视畸变;
- 正交相机(Orthographic):视景体为矩形盒,保留长度与角度不变。
"cameras" : [
  { "type": "perspective", "perspective": { "aspectRatio": 1.0, "yfov": 0.7, "zfar": 100, "znear": 0.01 } },
  { "type": "orthographic", "orthographic": { "xmag": 1.0, "ymag": 1.0, "zfar": 100, "znear": 0.01 } }
],
camera.perspective:aspectRatio(宽高比)、yfov(Y 方向视场角,弧度)。zfar为可选属性——省略时使用特殊的”无限投影矩阵”;camera.orthographic:xmag与ymag分别描述视景体的宽度与高度;- 两者均包含
znear与zfar(近/远裁剪面),两者的zfar均可选。
大多数图形 API 提供基于上述参数构建相机矩阵的方法。这些参数计算出相机矩阵(camera matrix),对其求逆得到视图矩阵(view matrix),再与模型矩阵(model matrix)后乘便得到模型视图矩阵(model-view matrix)。
相机朝向
相机通过 node 的 camera 属性附着。节点的全局变换定义了相机在世界空间中的位置与朝向。当相机节点的全局变换为单位矩阵时,视点位于原点,观察方向沿负 z 轴。节点可携带任意变换属性,对相机的动画可定义”相机飞行”(camera flight)效果。
相机实例化与管理
可定义任意数量的相机,且每个相机可被多个节点引用。JSON 中的相机定义为”模板”——每个节点引用创建该相机的一个实例。glTF 规范中不存在”默认”相机,活动相机的选择与管理由客户端应用负责(如下拉菜单切换预定义视图,或通过鼠标控制实现自定义相机操控)。
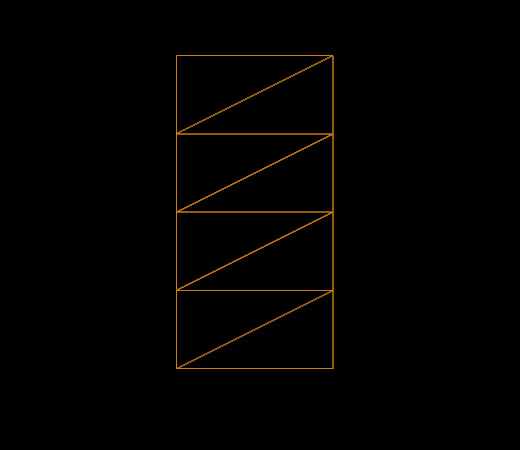
17. 简单 Morph Target 示例
自 glTF 2.0 起,规范支持为网格定义 morph target(形变目标)。Morph target 存储某些网格属性的”位移量”(displacement),即相对于基础几何的差异量。运行时,这些差异量以不同权重叠加到原始网格上。此技术广泛用于角色动画中的面部表情编码。
{
  "scene": 0, "scenes":[ { "nodes":[0] } ],
  "nodes":[ { "mesh":0 } ],
  "meshes":[ {
    "primitives":[ {
      "attributes":{ "POSITION":1 },
      "targets":[ { "POSITION":2 }, { "POSITION":3 } ],
      "indices":0
    } ],
    "weights":[ 0.5, 0.5 ]
  } ],
  "animations":[ {
    "samplers":[ { "input":4, "interpolation":"LINEAR", "output":5 } ],
    "channels":[ { "sampler":0, "target":{ "node":0, "path":"weights" } } ]
  } ],
  "buffers":[ { "uri":"data:application/gltf-buffer;base64,...", "byteLength":116 }, { "uri":"data:application/gltf-buffer;base64,...", "byteLength":60 } ],
  "bufferViews":[
    { "buffer":0, "byteOffset":0, "byteLength":6, "target":34963 },
    { "buffer":0, "byteOffset":8, "byteLength":108, "byteStride":12, "target":34962 },
    { "buffer":1, "byteOffset":0, "byteLength":20 },
    { "buffer":1, "byteOffset":20, "byteLength":40 }
  ],
  "accessors":[
    { "bufferView":0, "byteOffset":0, "componentType":5123, "count":3, "type":"SCALAR", "max":[2], "min":[0] },
    { "bufferView":1, "byteOffset":0, "componentType":5126, "count":3, "type":"VEC3", "max":[1.0,0.5,0.0], "min":[0.0,0.0,0.0] },
    { "bufferView":1, "byteOffset":36, "componentType":5126, "count":3, "type":"VEC3", "max":[0.0,1.0,0.0], "min":[-1.0,0.0,0.0] },
    { "bufferView":1, "byteOffset":72, "componentType":5126, "count":3, "type":"VEC3", "max":[1.0,1.0,0.0], "min":[0.0,0.0,0.0] },
    { "bufferView":2, "byteOffset":0, "componentType":5126, "count":5, "type":"SCALAR", "max":[4.0], "min":[0.0] },
    { "bufferView":3, "byteOffset":0, "componentType":5126, "count":10, "type":"SCALAR", "max":[1.0], "min":[0.0] }
  ],
  "asset":{ "version":"2.0" }
}
mesh.primitive 中的 targets 数组即为 morph target 列表——每个 target 将属性名映射至存储形变数据的 accessor。本例定义了两个 morph target,均映射 POSITION 属性。mesh 级别的 weights 数组定义每个 morph target 对最终渲染网格的贡献因子;动画可通过将 path 设为 "weights" 来驱动这些权重。
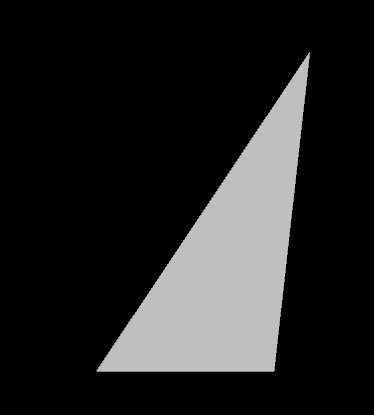
18. Morph Target 详解
基础三角形的几何由图元 POSITION 属性中的 accessor 数据定义(图中黑色三角)。每个 morph target 将 POSITION 映射至包含逐顶点位移向量的 accessor(红色与绿色箭头)。
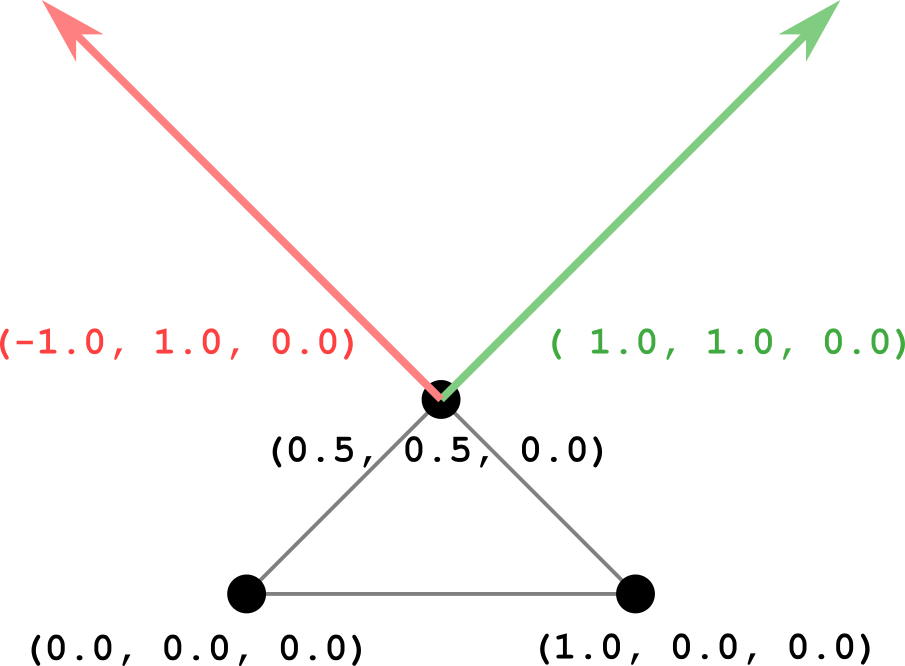
最终渲染的顶点位置由基础位置加上各 morph target 位移量的线性组合计算得到:
renderedPrimitive.POSITION = primitive.POSITION +
  weights[0] * primitive.targets[0].POSITION +
  weights[1] * primitive.targets[1].POSITION;
动画关键帧:
| 时间t/s | weights |
|---|---|
| 0.0 | (0.0, 0.0) |
| 1.0 | (0.0, 1.0) |
| 2.0 | (1.0, 1.0) |
| 3.0 | (1.0, 0.0) |
| 4.0 | (0.0, 0.0) |
权重在动画过程中被线性插值。例如在 \(t = 1.25\) 秒时权重为 \((0.25, 1.0)\),渲染结果如下:
19. 简单蒙皮示例
glTF 支持顶点蒙皮(vertex skinning),允许网格几何体依据骨骼(skeleton)的姿态进行变形。这是赋予虚拟角色逼真动画外观的关键技术。
以下为一包含基本顶点蒙皮的完整 glTF 资产:
{
  "scene" : 0,
  "scenes" : [ { "nodes" : [ 0 ] } ],
  "nodes" : [
    { "skin" : 0, "mesh" : 0, "children" : [ 1 ] },
    { "children" : [ 2 ], "translation" : [ 0.0, 1.0, 0.0 ] },
    { "rotation" : [ 0.0, 0.0, 0.0, 1.0 ] }
  ],
  "meshes" : [ {
    "primitives" : [ {
      "attributes" : { "POSITION" : 1, "JOINTS_0" : 2, "WEIGHTS_0" : 3 },
      "indices" : 0
    } ]
  } ],
  "skins" : [ { "inverseBindMatrices" : 4, "joints" : [ 1, 2 ] } ],
  "animations" : [ {
    "channels" : [ { "sampler" : 0, "target" : { "node" : 2, "path" : "rotation" } } ],
    "samplers" : [ { "input" : 5, "interpolation" : "LINEAR", "output" : 6 } ]
  } ],
  "buffers" : [
    { "uri" : "data:application/gltf-buffer;base64,...", "byteLength" : 168 },
    { "uri" : "data:application/gltf-buffer;base64,...", "byteLength" : 320 },
    { "uri" : "data:application/gltf-buffer;base64,...", "byteLength" : 128 },
    { "uri" : "data:application/gltf-buffer;base64,...", "byteLength" : 240 }
  ],
  "bufferViews" : [
    { "buffer" : 0, "byteOffset" : 0, "byteLength" : 48, "target" : 34963 },
    { "buffer" : 0, "byteOffset" : 48, "byteLength" : 120, "target" : 34962 },
    { "buffer" : 1, "byteOffset" : 0, "byteLength" : 80, "target" : 34962 },
    { "buffer" : 1, "byteOffset" : 80, "byteLength" : 160, "target" : 34962 },
    { "buffer" : 1, "byteOffset" : 240, "byteLength" : 80 },
    { "buffer" : 2, "byteOffset" : 0, "byteLength" : 48 },
    { "buffer" : 2, "byteOffset" : 48, "byteLength" : 80 },
    { "buffer" : 3, "byteOffset" : 0, "byteLength" : 120 },
    { "buffer" : 3, "byteOffset" : 120, "byteLength" : 120 }
  ],
  "accessors" : [
    { "bufferView" : 0, "byteOffset" : 0, "componentType" : 5123, "count" : 24, "type" : "SCALAR", "max" : [ 9 ], "min" : [ 0 ] },
    { "bufferView" : 1, "byteOffset" : 0, "componentType" : 5126, "count" : 10, "type" : "VEC3", "max" : [ 0.5, 2.0, 0.0 ], "min" : [ -0.5, 0.0, 0.0 ] },
    { "bufferView" : 2, "byteOffset" : 0, "componentType" : 5123, "count" : 10, "type" : "VEC4", "max" : [ 1, 1, 0, 0 ], "min" : [ 0, 0, 0, 0 ] },
    { "bufferView" : 3, "byteOffset" : 0, "componentType" : 5126, "count" : 10, "type" : "VEC4", "max" : [ 1.0, 1.0, 0.0, 0.0 ], "min" : [ 0.0, 0.0, 0.0, 0.0 ] },
    { "bufferView" : 4, "byteOffset" : 0, "componentType" : 5126, "count" : 2, "type" : "MAT4", "max" : [ 1.0, ... ], "min" : [ 0.0, ... ] },
    { "bufferView" : 5, "byteOffset" : 0, "componentType" : 5126, "count" : 12, "type" : "SCALAR", "max" : [ 5.5 ], "min" : [ 0.0 ] },
    { "bufferView" : 6, "byteOffset" : 0, "componentType" : 5126, "count" : 12, "type" : "VEC4", "max" : [ 0.0, 0.0, 0.707, 1.0 ], "min" : [ 0.0, 0.0, -0.707, 0.707 ] }
  ],
  "asset" : { "version" : "2.0" }
}
新增的顶层 skins 字典定义了蒙皮对象。图元属性新增 JOINTS_0 与 WEIGHTS_0,分别存储影响每个顶点的关节索引及对应权重。动画作用于骨骼节点,使蒙皮变形在动画播放过程中可见。
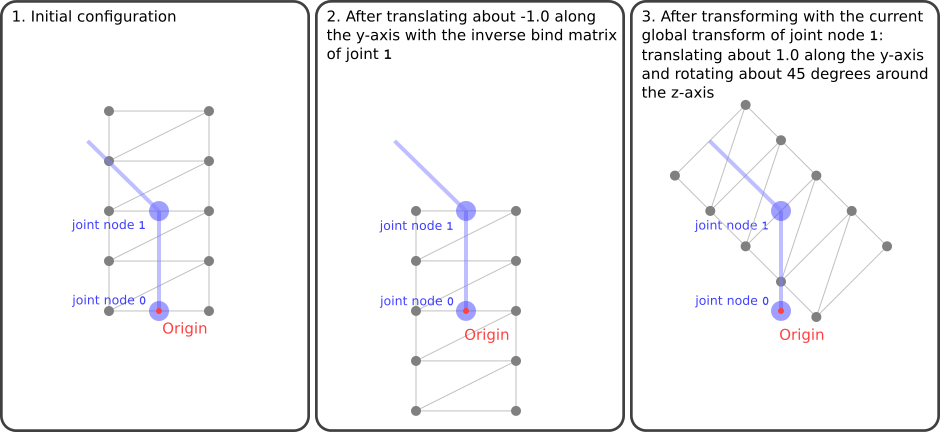
20. 蒙皮详解
几何数据
该示例的网格为索引三角形网格,共 8 个三角形、10 个顶点,形成 xy 平面上的一个矩形(宽 1.0,高 2.0),矩形底部中心位于原点 \((0,0,0)\)。
顶点位置坐标:
-0.5, 0.0, 0.0,     0.5, 0.0, 0.0,
-0.5, 0.5, 0.0,     0.5, 0.5, 0.0,
-0.5, 1.0, 0.0,     0.5, 1.0, 0.0,
-0.5, 1.5, 0.0,     0.5, 1.5, 0.0,
-0.5, 2.0, 0.0,     0.5, 2.0, 0.0
骨骼结构
两个”骨骼节点”(或”关节节点”)定义骨骼层次:
"nodes" : [ { "children" : [ 2 ] }, { "translation" : [ 0.0, 1.0, 0.0 ], "rotation" : [ 0.0, 0.0, 0.0, 1.0 ] } ],
蒙皮通过其 joints 属性引用这两个节点的索引。
蒙皮(Skin)
蒙皮是顶点蒙皮机制的核心元素:
"skins" : [ { "inverseBindMatrices" : 4, "joints" : [ 1, 2 ] } ],
其中 joints 数组列出骨骼层次中的关节节点索引,inverseBindMatrices 指向一个 accessor,为每个关节提供一个矩阵——即该关节在初始绑定姿态(bind pose)下全局变换的逆矩阵。
- 关节 0 的全局变换为单位矩阵,其逆绑定矩阵亦为单位矩阵;
- 关节 1 的全局变换沿 y 轴平移 1.0,其逆绑定矩阵为沿 y 轴平移 -1.0:
1.0   0.0   0.0    0.0
0.0   1.0   0.0   -1.0
0.0   0.0   1.0    0.0
0.0   0.0   0.0    1.0
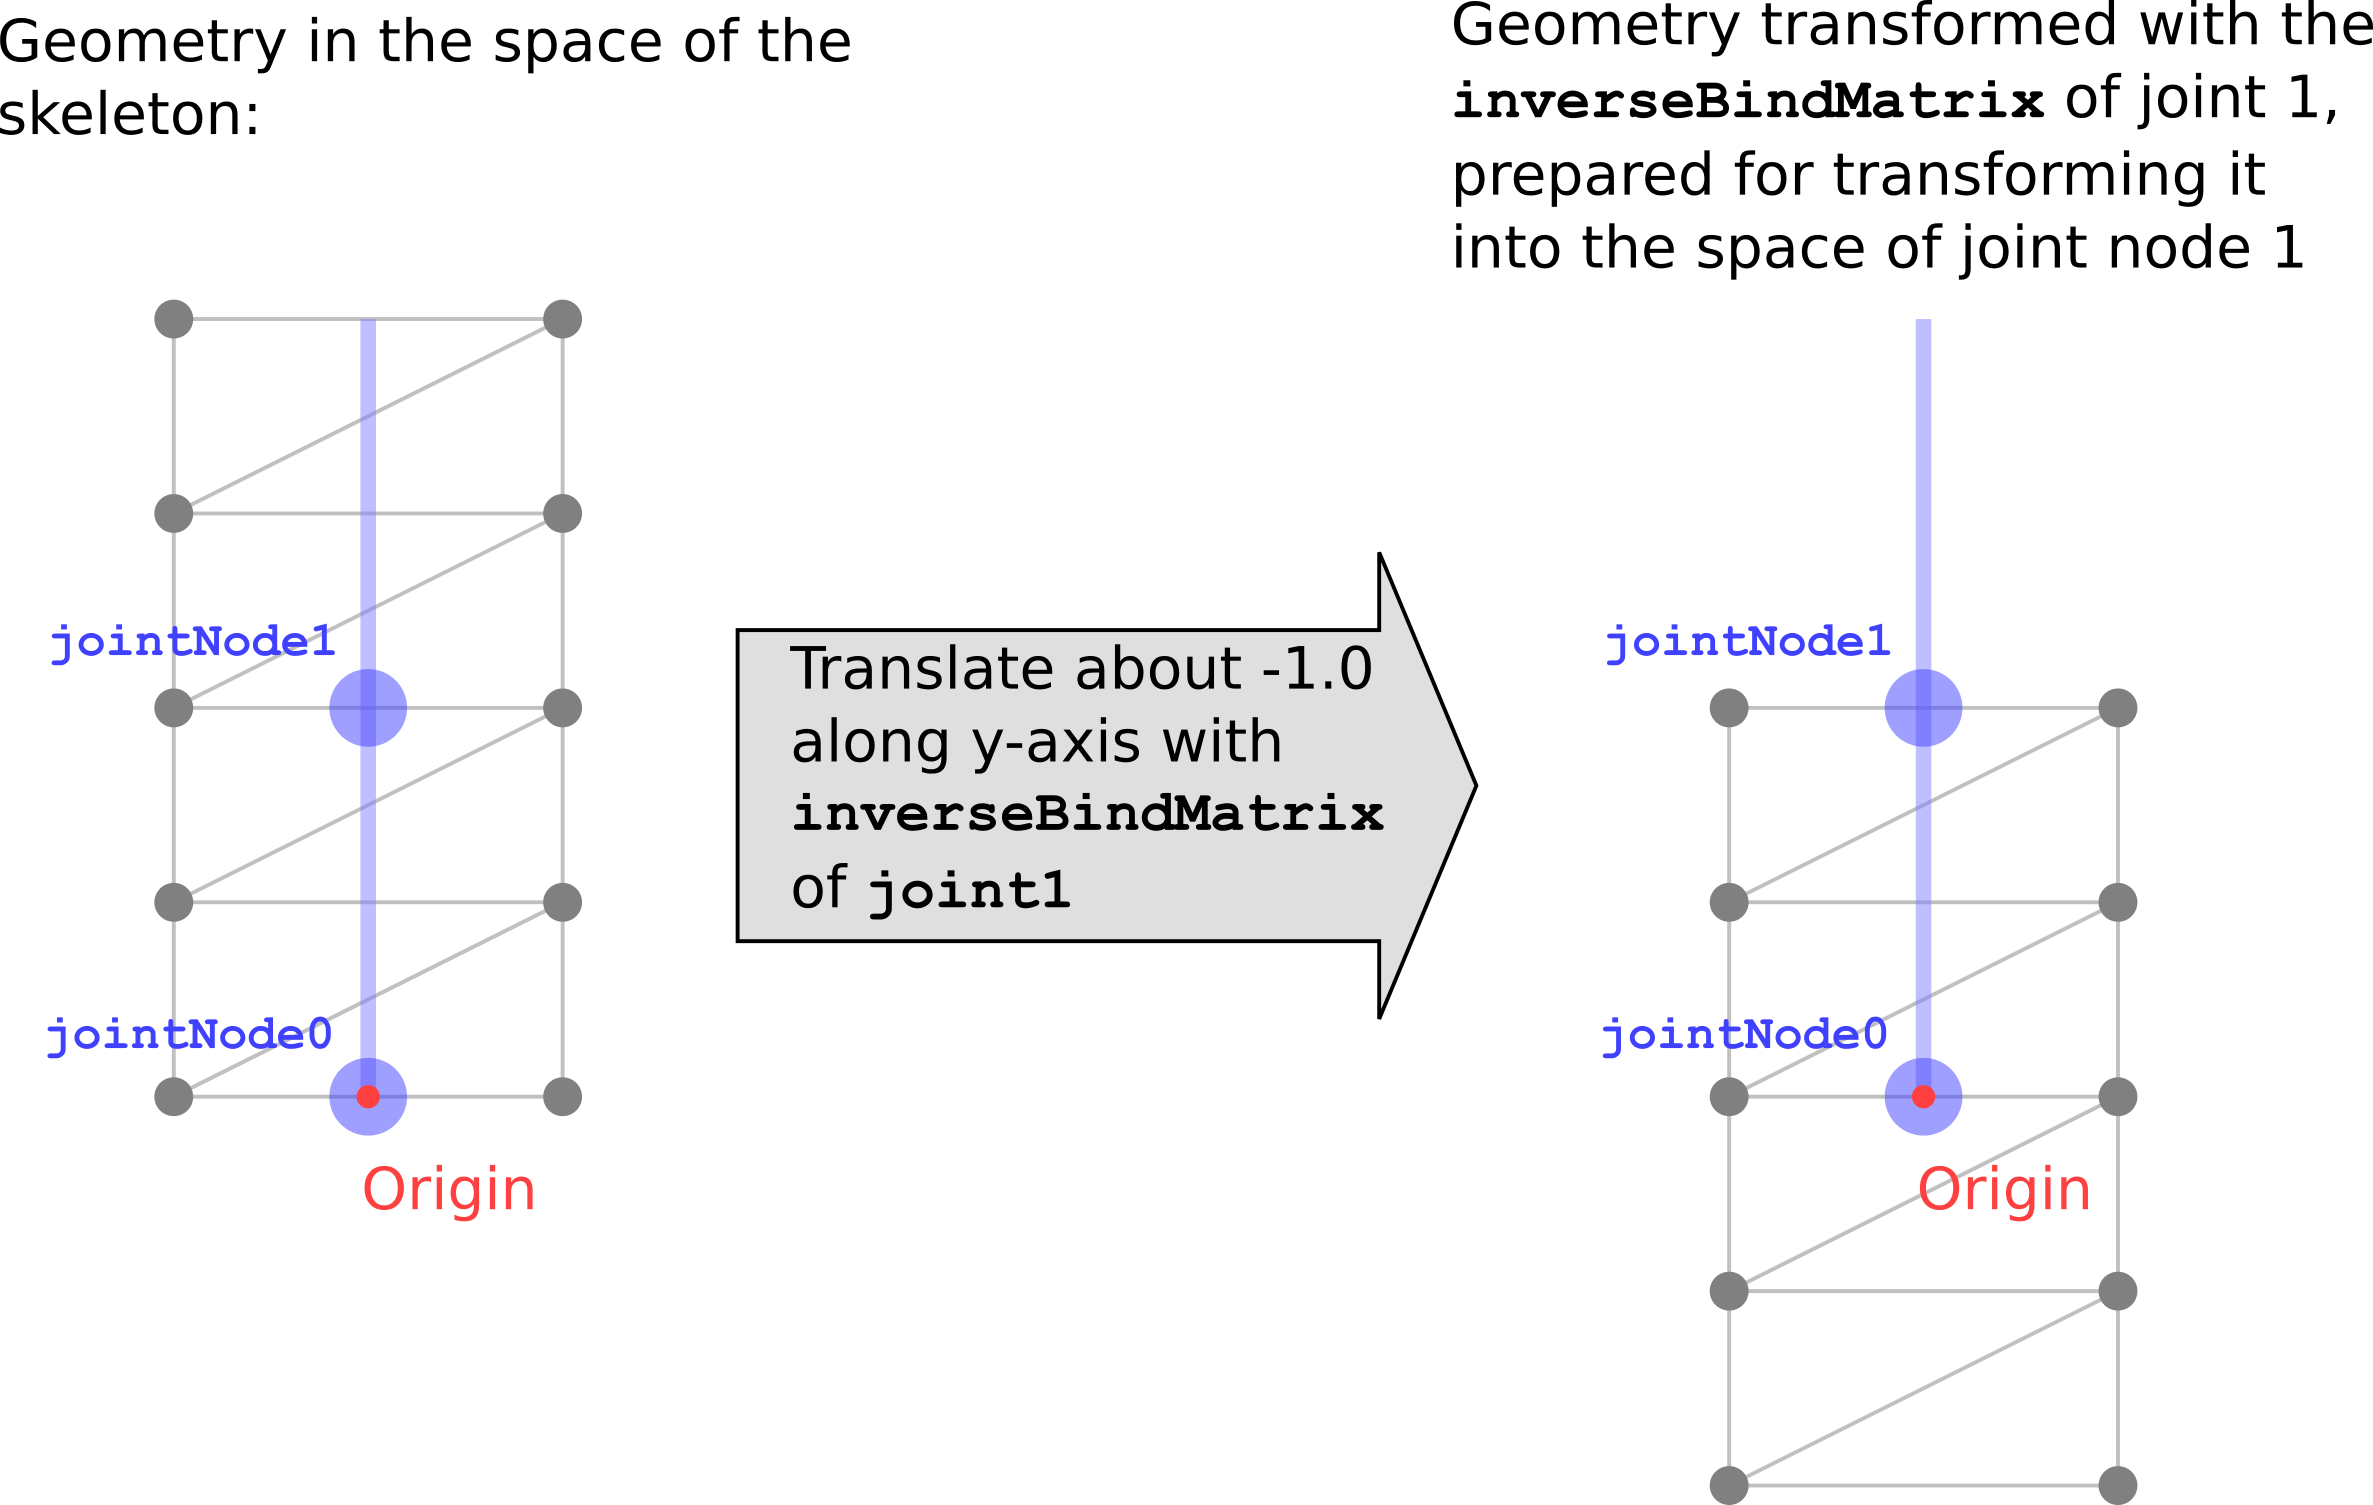
该变换将蒙皮顶点的坐标转换至各关节的局部坐标系,使得后续关节旋转操作在正确的坐标空间中执行。
顶点蒙皮实现
实际应用中,蒙皮计算通常在顶点着色器(vertex shader)中完成。
关节矩阵:每个关节矩阵执行两步变换:
- 乘以逆绑定矩阵,将顶点从模型空间变换至关节局部空间;
- 乘以该关节节点在当前动画状态下的全局变换。
jointMatrix(j) = globalTransformOfJointNode(j) * inverseBindMatrixForJoint(j)
蒙皮关节与权重:图元的 JOINTS_0 与 WEIGHTS_0 属性为每个顶点提供关节影响信息。JOINTS_0 为 4D 整型向量,限制每个顶点最多受 4 个关节影响;WEIGHTS_0 则指定对应关节的影响程度(所有权重之和应为 1.0)。
JOINTS_0:
Vertex 0:  0, 0, 0, 0      Vertex 1:  0, 0, 0, 0
Vertex 2:  0, 1, 0, 0      Vertex 3:  0, 1, 0, 0
Vertex 4:  0, 1, 0, 0      Vertex 5:  0, 1, 0, 0
Vertex 6:  0, 1, 0, 0      Vertex 7:  0, 1, 0, 0
Vertex 8:  0, 1, 0, 0      Vertex 9:  0, 1, 0, 0
WEIGHTS_0:
Vertex 0:  1.00,  0.00, ...   Vertex 1:  1.00,  0.00, ...
Vertex 2:  0.75,  0.25, ...   Vertex 3:  0.75,  0.25, ...
Vertex 4:  0.50,  0.50, ...   Vertex 5:  0.50,  0.50, ...
Vertex 6:  0.25,  0.75, ...   Vertex 7:  0.25,  0.75, ...
Vertex 8:  0.00,  1.00, ...   Vertex 9:  0.00,  1.00, ...
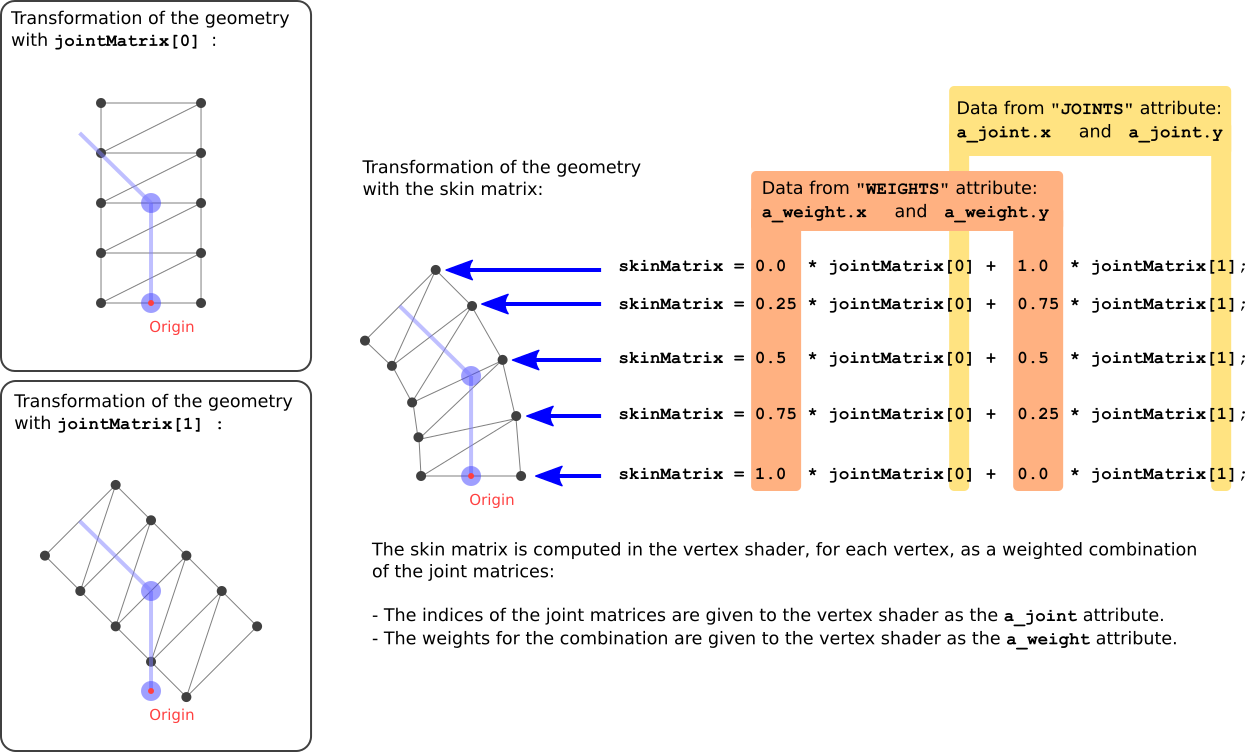
在顶点着色器中,为每个顶点计算关节矩阵的线性组合——即蒙皮矩阵(skin matrix),然后将原始顶点位置经该矩阵变换至世界空间:
attribute vec4 a_joint;
attribute vec4 a_weight;
uniform mat4 u_jointMat[2];

void main(void)
{
    mat4 skinMat =
        a_weight.x * u_jointMat[int(a_joint.x)] +
        a_weight.y * u_jointMat[int(a_joint.y)] +
        a_weight.z * u_jointMat[int(a_joint.z)] +
        a_weight.w * u_jointMat[int(a_joint.w)];
    vec4 worldPosition = skinMat * vec4(a_position, 1.0);
    vec4 cameraPosition = u_viewMatrix * worldPosition;
    gl_Position = u_projectionMatrix * cameraPosition;
}
原文:glTF Tutorial by Marco Hutter glTF 2.0 Specification
致谢:Patrick Cozzi (@pjcozzi)、Alexey Knyazev (@lexaknyazev)、Sarah Chow (@slchow)